
Monday, March 31, 2014
Sunday, March 30, 2014

Saturday, March 29, 2014
Blackberry 8230 9220 9320 9780 9790 and Z10 schematic diagram
blackberry 9360 curve shematics
 Blackberry 9360 curve SCH + POP 31269-011 schematic.part1.rar (390.6 KB, 33 views)Blackberry 9360 curve SCH + POP 31269-011 schematic.part2.rar (390.6 KB, 15 views)Blackberry 9360 curve SCH + POP 31269-011 schematic.part3.rar (390.6 KB, 18 views)
Quote:
Blackberry 9360 curve SCH + POP 31269-011 schematic.part1.rar (390.6 KB, 33 views)Blackberry 9360 curve SCH + POP 31269-011 schematic.part2.rar (390.6 KB, 15 views)Blackberry 9360 curve SCH + POP 31269-011 schematic.part3.rar (390.6 KB, 18 views) Friday, March 28, 2014


Thursday, March 27, 2014

Wednesday, March 26, 2014
Samsung I9070 GALAXY ADVANCE UNLOCK PROCEDURES complete guide files
PREPARATION and ROOTING:
download install kies and samsung usb drivers (skip if already done)
http://www.mediafire.com/?fw4ob2pdn6n923a
download root files and follow the steps for rooting:
http://www.mediafire.com/?s3wk86itqzp41ag
1. Download GT-I9070-root.rar, and extract it somewhere on you local disk.
2. From stuff you just extracted run program Odin3 v1.83.exe
3. Then open Settings in your phone, go to Aplications -> Development and check USB Debugging and Allow mock locations. Both needs to be Checked (Selected).
4. Turn off phone and turn it back on into Download mode,
press Volume Down + Home button + Power button, wait untill some "strange" screen appers, put in usb cable and choose continue.
5. Now wait until Odin recognize your phone. It can take a while first time, if you have problems search for samsung drivers on the internet,
6. Under PIT file browse for GT-I9070_EUR_XX_8G_20111220_KL6.pit, you have extracted this file before.
7. Under PDA choos rootkernel.tar.md5.
8. Then check what options are checked (Selected), be sure to UNCHECK (remove selction) Re-Partition, Flash Lock, Phone EFS Clear, Phone Bootloader Update!
Only Auto Reboot and F.Reset Time should be checked (Selected)

9. When this is set just press Start and wait for phone to reboot.
10. Now repeat steps from 4 to 9, now choose xxld1.tar.md5.
NOW install SUPERUSER from android market and
proceed with unlocking


download install kies and samsung usb drivers (skip if already done)
http://www.mediafire.com/?fw4ob2pdn6n923a
download root files and follow the steps for rooting:
http://www.mediafire.com/?s3wk86itqzp41ag
1. Download GT-I9070-root.rar, and extract it somewhere on you local disk.
2. From stuff you just extracted run program Odin3 v1.83.exe
3. Then open Settings in your phone, go to Aplications -> Development and check USB Debugging and Allow mock locations. Both needs to be Checked (Selected).
4. Turn off phone and turn it back on into Download mode,
press Volume Down + Home button + Power button, wait untill some "strange" screen appers, put in usb cable and choose continue.
5. Now wait until Odin recognize your phone. It can take a while first time, if you have problems search for samsung drivers on the internet,
6. Under PIT file browse for GT-I9070_EUR_XX_8G_20111220_KL6.pit, you have extracted this file before.
7. Under PDA choos rootkernel.tar.md5.
8. Then check what options are checked (Selected), be sure to UNCHECK (remove selction) Re-Partition, Flash Lock, Phone EFS Clear, Phone Bootloader Update!
Only Auto Reboot and F.Reset Time should be checked (Selected)
9. When this is set just press Start and wait for phone to reboot.
10. Now repeat steps from 4 to 9, now choose xxld1.tar.md5.
NOW install SUPERUSER from android market and
proceed with unlocking
Tuesday, March 25, 2014
Nokia E5 Camera Flash Light LED Torch Problem Solution

Repair hints for not working camera flash light on Nokia E5:
1. Check /reset the camera phone settings on the menu.
2. Check/clean the camera flash light connector terminals and contact pads.
3. Check the VBAT (battery voltage) across the two inductors coils.
4. Check/replace the two inductor coils.
5. Try to replace the camera flash LED bulb.
6. Replace the camera flash LED/Torch driver IC.
Monday, March 24, 2014
BlackBerry 8500 hard reset

A full reset is sometimes referred to as a hard reset. Perform a full reset when you want to clear all settings, programs and data from RAM.
Caution if you perform a full reset, your BlackBerry Curve 8520 or 8530 returns to its default settings and looses all information that is not recorded in ROM.
Before you delete your BlackBerry® device data or media card files, consider backing up these items so that you have a copy on your computer. CAUTION: If you have turned on encryption, the process for deleting all device data can take up to an hour to complete. You cannot stop the process after you start it. If you reset your device, the process restarts after the device restarts.
To perform a hard reset:
On the Home screen or in a folder, click the Options icon.
Click Security *gt; Security Wipe.
To delete data from the messages application, contacts application, and other applications, select the Emails, Contacts, Etc check box.
To delete all third-party applications that you have added, select the User Installed Applications check box.
To delete all files from your media card, select the Media Card check box.
Type blackberry.
Click Wipe.
Sunday, March 23, 2014
China MTK 6577 4 2 2 imei problem solution
MTK6577 4.2.2
This phone 2 diffrent method if not work this code method or after successfully write imei auto restart phone and again appear old imei
you need emmc this same phone, write emmc then write imei with any tool
if need emmc file and tool contact me on yahoo for emmc link

see this video
This phone 2 diffrent method if not work this code method or after successfully write imei auto restart phone and again appear old imei
you need emmc this same phone, write emmc then write imei with any tool
if need emmc file and tool contact me on yahoo for emmc link
see this video
try first this code
* # * # 3646633 # * # *
After
CDS Information
After
Radio Information
Then, for SIM1
Phone1
After
IMEI number of the phone that you scrap
AT + EGMR = 1.7, "123456789012345" (without the quotation marks will be exactly in the same way)
After
Pressing and changing IMEI number Send Command in at
For Sim2
Phone2
After
IMEI number of the phone that you scrap
AT + EGMR = 1.10, "123456789012345" (without the quotation marks will be exactly in the same way)
After
Pressing and changing IMEI number Send Command in at
Saturday, March 22, 2014
Symphony X120 Flash File
Symphony X120 (MTK-6235)


INFO - 02
TINNO35_09A_PCB01_GPRS_MT6235B_S01.E560_MP_BEGNALI _01_08.BIN
INFO - 01
TINNO35_09A_BOOTLOADER_V005_MT6235B_E560_MP_BEGNAL I_01_11.bin
TINNO35_09A_BOOTLOADER_V005_MT6235B_E560_MP_BEGNAL I_01_11.bin
INFO - 02
TINNO35_09A_PCB01_GPRS_MT6235B_S01.E560_MP_BEGNALI _01_08.BIN
Friday, March 21, 2014

Thursday, March 20, 2014
Symphony Ft29 Flash File
Symphony Ft29 (MTK-6252)

Info : 01
SYMPHONY_T51A_12864_11B_PCB01_GPRS_MT6252_S01.SYMP HONY_FT29_T515_M01_S05_120806.BIN
Project ID : SYMPHONY_FT29_T515_M01_S05_120806
CPU_Type = MT6252
Flash_ID = 00C80060
Chip Capacity = 0x1000000(16MB)
Password : ~Ashfaq~Tawhid~Rayan~

Info : 02
SYMPHONY_T51A_12864_11B_PCB01_GPRS_MT6252_S01.SYMP HONY_FT29_T515_M01_S08_120913.BIN
Project ID : SYMPHONY_FT29_T515_M01_S08_120913
CPU_Type = MT6252
Chip Capacity = 0x1000000(16MB)
Password : ~Ashfaq Tawhid Rayan~
Info : 01
SYMPHONY_T51A_12864_11B_PCB01_GPRS_MT6252_S01.SYMP HONY_FT29_T515_M01_S05_120806.BIN
Project ID : SYMPHONY_FT29_T515_M01_S05_120806
CPU_Type = MT6252
Flash_ID = 00C80060
Chip Capacity = 0x1000000(16MB)
Password : ~Ashfaq~Tawhid~Rayan~
Info : 02
SYMPHONY_T51A_12864_11B_PCB01_GPRS_MT6252_S01.SYMP HONY_FT29_T515_M01_S08_120913.BIN
Project ID : SYMPHONY_FT29_T515_M01_S08_120913
CPU_Type = MT6252
Chip Capacity = 0x1000000(16MB)
Password : ~Ashfaq Tawhid Rayan~
Wednesday, March 19, 2014
Symphony D46i Flash File
Symphony D46i (MTK-6250)

Info -
WBG1307SY_0201_PCB01_GPRS_MT6250_S00.1307SY_0201_V 0807.BIN
Project ID : 1307SY_0201_V0807
CPU_Type = MT625A
Nor Flash ID = 002C00CB
Flash_Type = SF_N25W128
Chip_Capacity = 0*1000000 (16MB)
Password : shfaq~T@whid~Rayan

Info -
WBG1307SY_0201_PCB01_GPRS_MT6250_S00.1307SY_0201_V 0807.BIN
Project ID : 1307SY_0201_V0807
CPU_Type = MT625A
Nor Flash ID = 002C00CB
Flash_Type = SF_N25W128
Chip_Capacity = 0*1000000 (16MB)
Password : shfaq~T@whid~Rayan
Tuesday, March 18, 2014
Nokia N9 On Off Way solution Here 100 Tested Solution
Nokia N9 On/Off Way solution Here
100% Tested Solution
Try This Solution I Hope solved Your
Problem

Monday, March 17, 2014
Huawei C8600 Tech Specs
Huawei C8600

Specifications
- Display:
- TFT capacitive touchscreen, 262k colors
- 480 x 320 pixels, 3.5 inches
- Accelerometer and G-sensor for auto-rotate
- Proximity sensor (binary, for locking the screen during calls)
- CPU:
- CPU Clock: 528 MHz
- CPU: Qualcomm MSM 7627
- Instruction Set: ARMv6
- Memory:
- RAM: 256 MB
- ROM: 512 MB (160MB User Accessible)
- Card slot: microSD, up to 32GB
- Networks:
- CDMA800 (BC0)
- Data:
- cdmaOne
- CDMA2000 1xRTT
- CDMA2000 1xEV-DO Rel. 0
- CDMA2000 1xEV-DO Rev. A
- WLAN: WiFi 802.11 b/g/n
- Bluetooth: v2.1 with A2DP
- USB: microUSB v2.0
- Controls:
- Positioning Device: Touchscreen
- Primary Keyboard: N/A
- Directional Pad: N/A
- Scroll Wheel: N/A
- Camera:
- Sensor: CMOS
- Resolution: 2048x1536 pixels (3.15MP)
- Autofocus: N/A
- Flash: N/A
- Camcorder: 720x480 pixels
- Geo-tagging
- Size:
- Dimensions: Width/Height/Depth 62.5mm x 116mm x 13.6mm
- Weight: 130 grams w/battery.
- Audio:
- Audio Channels: Stereo
- Microphone: Mono
- Loudspeaker: Mono
- Audio Output: 3.5mm Jack
- GPS:
- A-GPS.
- Orientation and location:
- Accelerometer & digital compass.
- Radio Receiver:
- Supported
- Battery:
- Standard battery, Li-Ion 1500 mAh
- Stand-by Up to ---h
- Talk time Up to --- h
- Supported Formats:
- Video: H.263, H.264, MP4, 3GP
- Audio: MP3, WMA, AAC+
- (Ogg Vorbis, MIDI and WAV also supported for ringtones)
Saturday, March 15, 2014

Friday, March 14, 2014

Thursday, March 13, 2014

Wednesday, March 12, 2014
Samsung Galaxy Tab2 7 0 P3100 Password Done by Hard Reset
Status


Procedure
Make sure tab is turned off, Press and hold the Power button for about 10 seconds to turn it off.
Press and hold the “Volume Up” and “Power” buttons at the same time, when logo appears on the screen release the “Power” button and continue press the “Volume” button
When recovery screen appears use “Volume Up/Down” buttons to navigate and select “wipe data / Factory reset” by pressing the “Home” or “Power” button (Depends on Galaxy Tab model).


Finished Product


Procedure
Make sure tab is turned off, Press and hold the Power button for about 10 seconds to turn it off.
Press and hold the “Volume Up” and “Power” buttons at the same time, when logo appears on the screen release the “Power” button and continue press the “Volume” button
When recovery screen appears use “Volume Up/Down” buttons to navigate and select “wipe data / Factory reset” by pressing the “Home” or “Power” button (Depends on Galaxy Tab model).
Finished Product
Tuesday, March 11, 2014
Samsung C3303 no power done
PROBLEM = NO POWER
MY FIRST CHOICE IS REPROGRAM
BEFORE

TOOLS = Z3X BOX + USB CABLE #5PIN
PROCEDURE
01.OPEN 2G TOOLS
02.SELECT DESIRED UNIT SAMSUNG C3303
03.PUT FW
04.TICK WRITE FW
PROCESSING SCREEN SHOT

FINISH PRODUCT
 __________________
Monday, March 10, 2014
Symphony D100 Flash File By GSM HOQUE
Symphony D100 (MTK-6252)

Info -
ZS616A44_PCB01_GPRS_MT6252_S01.ZS616A_044A_V8_0_3. BIN
Project ID : ZS616A_044A_V8_0_3
CPU_Type = MT6252
CPU_ID = 00000007
NOR_ID = 00EF006000170000
NOR_Size = 8MB
Info -
ZS616A44_PCB01_GPRS_MT6252_S01.ZS616A_044A_V8_0_3. BIN
Project ID : ZS616A_044A_V8_0_3
CPU_Type = MT6252
CPU_ID = 00000007
NOR_ID = 00EF006000170000
NOR_Size = 8MB
Sunday, March 9, 2014

Saturday, March 8, 2014

Friday, March 7, 2014
Samsung SGH T869 Galaxy Tab 7 0 Plus T Mobile Firmwares
This Model for T-Mobile Network in USA
Android 3.2:
- T869UVKJD / TMB USA T-Mobile
- T869UVKL2 / TMBKL2 USA T-Mobile
Android 4.0.4:
- T869UVLG7 / TMBLG7 USA T-Mobile
Thursday, March 6, 2014
zZKey SmartZ released v1 6 19! More Alcatel and Motorola added
zZKey SmartZ released v1.6.19! More Alcatel and Motorola added
"Happy Halloween Day!!!"
Enjoy with us from USA Halloween Day <Trick or treatZ> "Come On, more candy for childrens"
We never resting. Our purpose is bring to all our users the most complete and advanced solution never seen before

What New:
-------------------
* Motorola MB853 (Electrify) (Repair IMEI {World First}, Read codes, Direct Unlock, Reset wrong attempts codes, Relock)
* Motorola MB855 2 new firmware added.
* Motorola MB860 6 new firmware added.
* Alcatel OT-C990 [Direct Unlock, Relock, World First {Repair IMEI} (all in less than 3 seconds)]
* Alcatel OT-MOVE [Direct Unlock, Relock, World First {Repair IMEI} (all in less than 3 seconds)]
* Alcatel OT-V958 [Direct Unlock, Relock, World First {Repair IMEI} (all in less than 3 seconds)]
Alcatel, Motorola IMEI repair take 4 zZKey credits
zZKey SmartZ, Module Features
Brand : Alcatel, Motorola, Zte Phones, Zte Modem
Direct Unlock... Supported!
Read Codes... Supported!
IMEI Repair!! Supported!
Relock operation... Supported!
Multilingual Software (SPANISH; ENGLISH, ARABIC, PORTUGUESE, ITALIAN, RUSSIAN)
Heuristic Method
DISCLAIMER:
--------------------------
The change IMEI/MEID option has been created by our zZ-Team only with the objective of restablishing the original imei. Any illegal use with the IMEI/MEID, changes or modifications of the original IMEI, are on their own responsibility. Our zZ-Team no assumes responsibility to misuse of this software.
-------------------------
SmartZ_v1.6.19 Download here
--------------------------------
SURPRISE AGAIN!!!!!!!!!!!!!! FREE CREDITS FOR MOST SATISFACTORY USER REPORT
1- @bojadzic -> 5 FREE Credits
2- @alex_030385 -> 5 FREE Credits
3- @master353535 -> 5 FREE Credits
Please contact us
You want free zZKey credits? Of course is your turn now, report success of Huawei module, SMARTZ Module,, and you will be next winner!!!
"Happy Halloween Day!!!"
Enjoy with us from USA Halloween Day <Trick or treatZ> "Come On, more candy for childrens"
We never resting. Our purpose is bring to all our users the most complete and advanced solution never seen before
What New:
-------------------
* Motorola MB853 (Electrify) (Repair IMEI {World First}, Read codes, Direct Unlock, Reset wrong attempts codes, Relock)
* Motorola MB855 2 new firmware added.
* Motorola MB860 6 new firmware added.
* Alcatel OT-C990 [Direct Unlock, Relock, World First {Repair IMEI} (all in less than 3 seconds)]
* Alcatel OT-MOVE [Direct Unlock, Relock, World First {Repair IMEI} (all in less than 3 seconds)]
* Alcatel OT-V958 [Direct Unlock, Relock, World First {Repair IMEI} (all in less than 3 seconds)]
Alcatel, Motorola IMEI repair take 4 zZKey credits
zZKey SmartZ, Module Features
Brand : Alcatel, Motorola, Zte Phones, Zte Modem
Direct Unlock... Supported!
Read Codes... Supported!
IMEI Repair!! Supported!
Relock operation... Supported!
Multilingual Software (SPANISH; ENGLISH, ARABIC, PORTUGUESE, ITALIAN, RUSSIAN)
Heuristic Method
DISCLAIMER:
--------------------------
The change IMEI/MEID option has been created by our zZ-Team only with the objective of restablishing the original imei. Any illegal use with the IMEI/MEID, changes or modifications of the original IMEI, are on their own responsibility. Our zZ-Team no assumes responsibility to misuse of this software.
-------------------------
SmartZ_v1.6.19 Download here
--------------------------------
SURPRISE AGAIN!!!!!!!!!!!!!! FREE CREDITS FOR MOST SATISFACTORY USER REPORT
1- @bojadzic -> 5 FREE Credits
2- @alex_030385 -> 5 FREE Credits
3- @master353535 -> 5 FREE Credits
Please contact us
You want free zZKey credits? Of course is your turn now, report success of Huawei module, SMARTZ Module,, and you will be next winner!!!
Wednesday, March 5, 2014


Tuesday, March 4, 2014
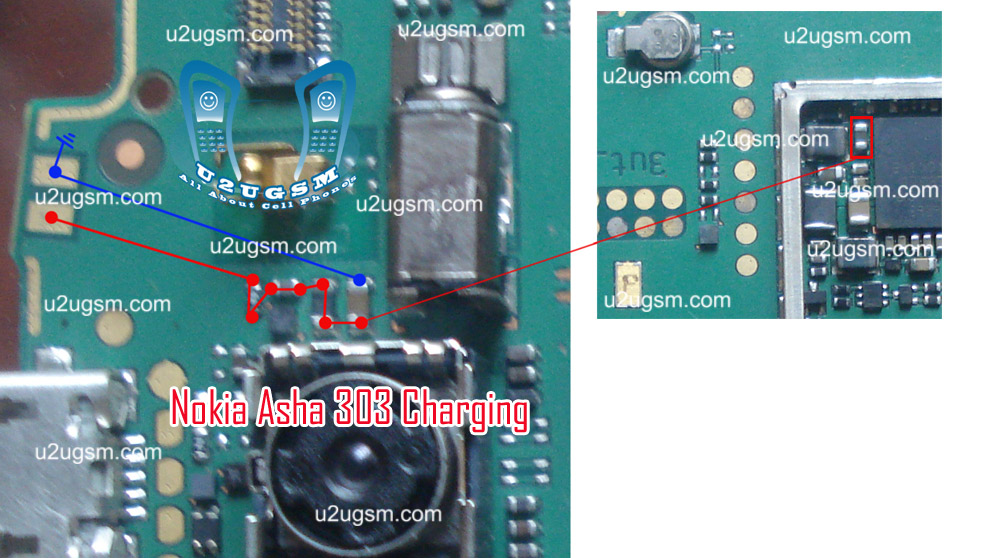
Nokia Asha 303 Charging Problem Solution Jumpers Ways
nokia asha 303 if it is not charging ok and you have not charging problem in nokia asha 303 then you can solve this problem with help of diagram bellow. in this diagram all charging links are identified so that you can understand which parts are used in charging function in nokia asha 303.Nokia 2330 Classic Auto Restart On Off Problem Solution

So one print is ground it is identified in diagram with blue color and red cooler is a positive print and you can check all track with meter and if any of them is broken you can apply jumper as defined in repairing diagram.mostly if we plug in charger and it does not show any thing it can be fault of charging base or may be fault of broken link. so check charging base also.
If it shows not charging indication or a message charger not supported then it can be fault of charging ic or may be due to 47k resistance. About these problems I will post in upcoming days.

for more detail and new tips and tricks about cellphone service problem keep visiting this page we will update cellphone service diagrams timely with new cellphone diagrams.some related post are also given bellow you can read them also for more information about cellphone.

So one print is ground it is identified in diagram with blue color and red cooler is a positive print and you can check all track with meter and if any of them is broken you can apply jumper as defined in repairing diagram.mostly if we plug in charger and it does not show any thing it can be fault of charging base or may be fault of broken link. so check charging base also.
If it shows not charging indication or a message charger not supported then it can be fault of charging ic or may be due to 47k resistance. About these problems I will post in upcoming days.
for more detail and new tips and tricks about cellphone service problem keep visiting this page we will update cellphone service diagrams timely with new cellphone diagrams.some related post are also given bellow you can read them also for more information about cellphone.
Monday, March 3, 2014
How To Hard Reset Galaxy Note 3
Samsung Galaxy Note 3 SM-N900 Hard Reset Steps:
- Take out your phones battery, SIM-card and memory card too.
- Take out your phones battery, SIM-card and memory card too.
- After 10 seconds put the battery back into your phone.
- Press and hold Volume Up key + Home key then press Power key.
- Keep pressing the above keys until Samsung logo appears,Then release Power key only.
- When you see Android Green man release all keys.
- You will get Factory reset / System Recovery menu on screen.
- Use Volume Down key to select Wipe Data / Factory Reset option.
- Use Power key to confirm the operation.
- You need to use the Volume Down key again to select "Yes -- delete all user data"
- Use Power key to confirm.
- After performing the hard reset, Select Reboot System Now option, And confirm it using Power key.
- Now the phone will reboots, Wait for it to be fully on and then you can start using it.
Sunday, March 2, 2014

Subscribe to:
Posts (Atom)